This guide explores microphone positioning on different Dell Chromebook models, offers optimization tips, and outlines solutions for common problems.
Related: Dell vs HP Laptops: Which is Better?
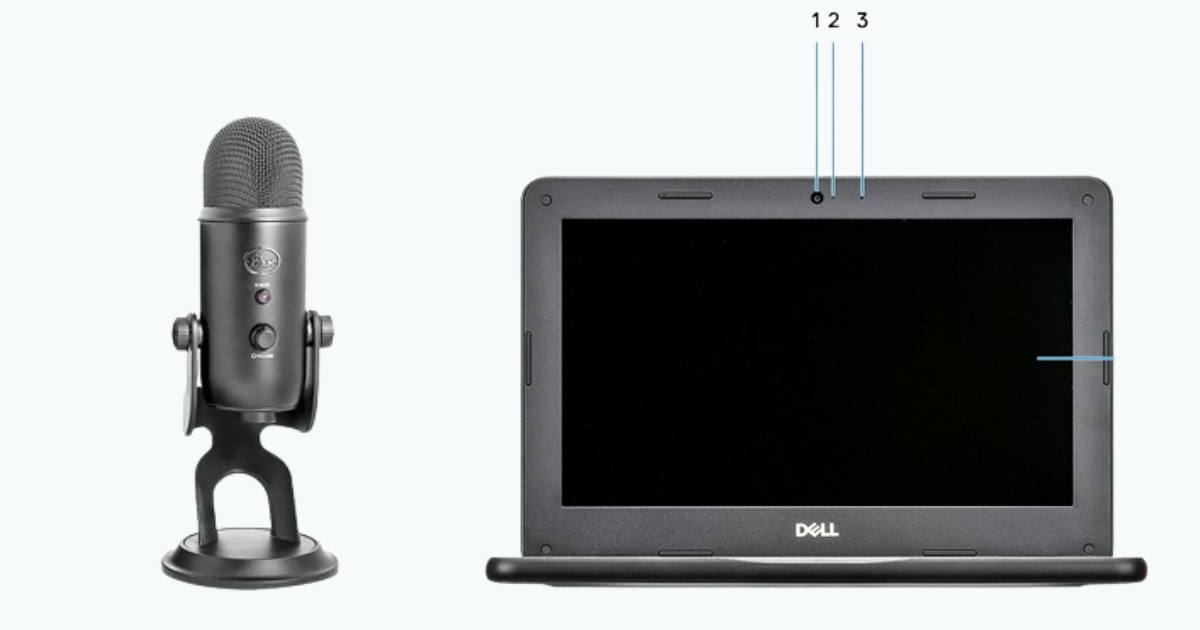
Where is the Microphone Located on the Dell Chromebook?
Dell offers various Chromebook models, each with unique features and designs. But one common location for the microphone is along the top edge of the Chromebook’s screen.
Here are some standard Dell Chromebook models and their corresponding microphone placements:
| Dell Chromebook Model | Microphone Placement | Comments |
|---|---|---|
| Dell Chromebook 11 3000 Series | It is usually positioned close to the webcam either on the right side of the camera lens. | This positioning ensures that it captures your voice clearly during video calls and recordings. |
| Dell Inspiron Chromebook 14 | The microphone is typically situated near the top of the keyboard, integrated into the device’s bezel. | It is designed and installed so as to reduce ambient noise and enhance voice quality during online meetings. |
| Dell Latitude Chromebook Enterprise | It can usually be found near the laptop’s hinge, just above the keyboard. | The build integration optimizes voice pickup and minimizes keyboard noise during communication. |
| Dell Chromebook 13 | The microphone is often positioned close to the front edge of the device, near the screen hinge. | The mic placement ensures effective voice capture while preventing interference from keyboard or fan noise. |
| Dell 2-in-1 Chromebook 14 | For this versatile 2-in-1 model, the microphone is generally located on the top bezel, close to the display. | Such placement enables clear audio capture whether you’re using the device in laptop or tablet mode. |
| Dell Chromebook Enterprise 5300 2-in-1 | On this enterprise-grade 2-in-1, the microphone is commonly placed near the center of the top bezel. | The mic design/build provides balanced audio pickup during video conferences and multimedia activities. |
Related: Best Dell Laptops
How to Find the Mic on Your Dell Chromebook
Locating the microphone on your Dell Chromebook is straightforward once you know what to look for.

While the exact placement might vary depending on the model, here are some general guidelines and tips to help you find the microphone on your Chromebook.
- Check near the webcam: In many Dell Chromebook models, the microphone is close to the webcam. Look for a small opening or perforated area near the top of the screen, either to the left or right of the webcam lens. This area houses the microphone.
- Observe the keyboard area: On some Dell Chromebook models, especially those with a 2-in-1 or convertible design, the microphone might be near the top of the keyboard. Their mics are generally built into the bezel directly above the keyboard due to their design philosophy, ensuring optimal speech quality while minimizing background noise in both laptop and tablet modes.
- Examine the bezel or hinge: Certain Dell Chromebooks position the microphone near the top bezel or the hinge area. This placement is strategic as it prevents interference from keyboard sounds.
- Refer to the user manual: Suppose you’re having trouble locating your Dell Chromebook model’s microphone. In that case, referring to the user manual that came with your device can be immensely helpful. The manual often includes detailed illustrations or descriptions of the laptop’s physical features, including and not limited to the microphone’s placement.
- Online resources and support: Dell’s official website and support resources can also provide valuable information about your Chromebook’s features and design. Also, you can find visual guides or FAQs that can help you identify your microphone’s location via popular blogs and online learning platforms.
Related: How to fix a Dell laptop that won’t Turn on
How to Fix Mic Not Working on a Dell Chromebook
So now you’ve been able to locate your Chromebook’s microphone. Still, the laptop doesn’t register audio input when you speak directly to the mic. You’re not alone. In fact, several various approaches can be taken to address this very common problem.
Let’s quickly explore common Chromebook microphone issues and simple ways to troubleshoot them.
#1 Test the microphone
Before troubleshooting, make sure the internal microphone is the issue. If you use Google Chrome, download an extension like “Microphone Test” to check internal and external mics.
Once the extension is added to your system settings, click the new icon that will have popped up in the top-right corner or system tray. This will take you to a new browser page. You’ll want to speak into your microphone in the new menu and observe if the audio bars react.
If the bars move, your microphone is fine. However, the audio quality bars don’t react; you might need to verify the microphone settings or adjust the sensitivity.
#2 Set your mic as default
Suppose you’ve installed a microphone testing extension but aren’t seeing any activity in the bars or soundwaves. In that case, the next step is to adjust the default microphone used as the audio input built. Occasionally, your Chromebook could default to a headphone jack previously connected to an external mic or other peripheral device.
The solution is simple and can be completed directly on the Chromebook in three simple steps.
- Open the Settings menu.
- Navigate to the Audio section and find the Microphone settings.
- Confirm that the default microphone selected is your built-in microphone.
#3 Adjust the mic sensitivity
Once you’ve ensured that your chosen built-in or external microphone is correctly set as the default, reevaluate the microphone test extension. This time, you should observe some activity in the soundbars or soundwaves.
Should you detect movement but it appears faint, it will be necessary to fine-tune your microphone’s sensitivity using either the microphone icon or the site settings.
Achieving this adjustment involves five straightforward steps.
- Access the system tray and select Settings.
- Navigate to the Audio segment and locate the Microphone settings.
- Click on Input, followed by the Microphone slider bar.
- Slide the bar to the right to heighten sensitivity.
- Save the modifications, exit from settings, and proceed to test the microphone.
If you can’t observe any movement in the soundbars despite these adjustments, it could be time to update your audio input permissions.
#4 Configure the microphone permissions
While usually not a direct issue with your computer, microphone permissions might require updates when utilized through online platforms like Zoom or Microsoft Teams.
Occasionally, these programs default to administrator-only access, limiting microphone availability within certain applications. To modify voice input permissions and headset access, launch the Chrome device program and give it a few seconds.
Sometimes, a small pop-up window might appear, querying your authorization for access to the Chromebook’s microphone. If so, click “yes” to grant permission. Yet, if the pop-up doesn’t emerge, you’ll have to review permissions in the program’s settings manually.
For those using Google Chrome as their default browser, proceed to the screen’s upper-right corner and click on the three vertical dots adjacent to your Google user icon.
Follow these steps to adjust permissions within the privacy and security section manually:
- Click on the vertical dots, then proceed to Chromebook Settings.
- From Settings, navigate to Privacy and Security.
- Access Site Settings and select that option.
- Click on Permissions, followed by Microphone.
Within this section, review the granted or denied permissions for your microphone. Adjust them to ensure your microphone can capture audio using specific programs or websites.
Related: How to Connect Airpods to Dell Laptops
Additional Tips to Fix Mic Not Working on a Dell Chromebook
If the previous solutions aren’t yielding results, supplementary troubleshooting steps are available to explore. Let’s quickly review them.
1. Deactivate Chrome extensions
There are instances where multiple Chrome extensions can clash, leading to the haphazard functionality of your microphone within Chrome. If you’re experiencing intermittent microphone issues, this could be the culprit. The most effective approach is to methodically turn off extensions to identify the culprit extension. The process will be swift and straightforward for those with just a few Chrome extensions.
However, if your extension count is substantial, this troubleshooting process may consume considerable time.
Here’s how to go about it:
- Click the three vertical dots in the top-right corner of Chrome.
- Navigate to “More Tools” and then select “Extensions” or “Apps.”
- Within this menu, proceed to deactivate or uninstall each extension or app individually.
After each removal, test your built-in microphone. Since you’ll assess the Chromebook’s microphone after every extension or app removal, this procedure can vary from a few minutes to several.
2. Try guest mode
If you’re encountering microphone problems while using a specific user profile on your Chromebook, or if certain programs fail to function as an administrator, try logging into the guest mode or using a different user account.
To employ guest mode for microphone access:
- While logged into your account, access Quick Settings, located near the clock at the bottom of your screen.
- Choose the SignOut option.
- Next, click on “Browse As a Guest.”
Once logged in as a guest, you can launch applications like Zoom or other microphone-dependent programs to assess if your microphone operates correctly under these circumstances.
3. Use an external mic
If your built-in microphone and audio settings exhibit problems, even after confirming that your Chrome drivers are functional and up-to-date, consider using an external microphone as an alternative solution. This could include options like the Blue Yeti mic, a gaming headset, or headphones with a microphone.
Follow these steps:
- Connect the external microphone to your Chromebook via a USB port or a 3.5mm jack, depending on the available ports.
- If you’re using a headset with a microphone, simply plug it into the appropriate input access point. This will enable the microphone to capture audio and adjust naturally.
Most external microphones and headphones with built-in mics are plug-and-play devices. This means they will automatically install themselves and update their drivers when connected to your Chromebook’s input access point.
4. Explore alternative software
In certain scenarios, the software you’re using might be the root cause, especially if it’s incompatible with your microphone’s driver version. In such cases, switching to alternative software is a viable option.
Consider trying different online video conferencing platforms like:
- Skype
- Zoom
- Discord
- Microsoft Teams
- Google Classroom
- Google Duo
- Google Hangouts
- Google Meet
Suppose you try another video call app, and your microphone works fine. In that case, the issue is incompatibility with the previous app’s sound settings.
5. Perform a factory reset
As a last resort effort to address persistent microphone issues, consider doing a full factory reset on your Chromebook, including its settings.
It’s worth mentioning that this approach comes with a significant drawback — it will erase all your software, saved folders, and bookmarks. Your computer will be reset to its original factory state as if it were brand new.
While this step can resolve various hardware-related problems, including microphone and sound setting issues, it should unequivocally be reserved as a final attempt. If older laptops are no longer under warranty, this might be the only viable avenue to explore.
Here’s how to proceed:
- Click the System Settings option located near the clock at the bottom right corner.
- Proceed to the Gear Icon and advance to the Advanced section.
- From this point, choose the Reset Settings option.
- Confirm your choice by clicking Reset a second time.
This action will initiate a comprehensive wipe and reset of your system settings. The duration of the process may vary based on the amount of saved information it needs to erase. Upon completing the process, your Chromebook will be restored to a new state. This often leads to resolving numerous prior issues you may have encountered.
Frequently Asked Questions
Yes, the vast majority of Chromebooks come equipped with built-in microphones. They are commonly included to support features like video calls, voice commands, and audio recording.
Most Chromebooks do not come with a traditional microphone jack. They are designed to be compact and often prioritize USB-C ports for connectivity. If you need an external microphone, you should use a USB microphone or a USB-C to audio jack adapter.
Chromebooks do not have an inbuilt voice recording program for audio recording tasks. Nevertheless, you can utilize various browser-based tools and applications to record audio on your Chromebook. There’s also the option of using web-based Digital Audio Workstations (DAWs) to record sound directly on your Chromebook.
Conclusion: Mic on a Dell Chromebook
In a nutshell, knowing where your Chromebook’s microphone is located comes with several benefits. Whether you’re troubleshooting issues or considering using a headset with a mic, this awareness proves valuable. By exploring the troubleshooting options and fixes we discussed in this piece, we hope you’ve restored your microphone’s functionality and are on your way to using your Chromebook faultlessly.