Apple has introduced an impressive feature called Personal Voice in iOS 17. How does this work? Read on to find out.
What is Personal Voice in iOS 17?
This is an innovative accessibility feature in iOS 17 that enables users to create a highly realistic digital representation of their own unique voice. Leveraging on-device machine learning, Personal Voice analyzes 15 minutes of recorded audio clips to generate a customized voice model directly on your iPhone.
With this feature, you can use Live Text to type or choose pre-defined phrases, which will be spoken aloud in your own voice during phone calls, FaceTime conversations, or in-person interactions. Apple states that Personal Voice can assist individuals with conditions such as ALS (Amyotrophic Lateral Sclerosis) or other impairments that affect their speech capabilities. The feature enables them to retain their unique voice, enhancing their ability to communicate effectively and seamlessly.
How to set up Personal Voice on iOS 17
Below is a step-by-step guide on how to set up Personal Voice on iOS 17. These steps will allow you to set up and create your own Personal Voice on iOS 17.
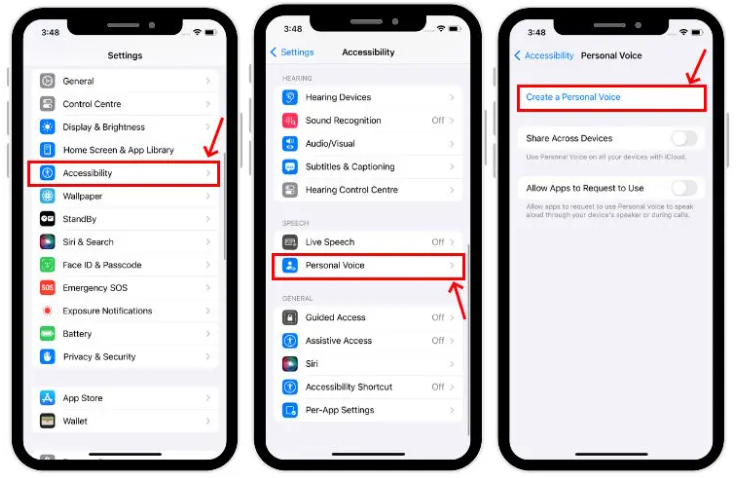
- Open the Settings app on your iOS 17 device.
- Go to Accessibility. You can find this option by scrolling down or using the search bar at the top of the Settings app.
- Tap on Personal Voice.
- To start the setup process, simply choose the option “Create a Personal Voice.”
- You will be prompted to record 150 phrases to create your Personal Voice.
- Start recording the phrases one by one. Speak clearly and at a natural pace. It is advisable to stay in a quiet room while holding the iPhone directly in front of your face.
- Once you have recorded all 150 phrases, lock your phone and place it on a charger. This allows the processing of your voice to take place.
- Apple mentions that it may take overnight for your voice to be created. In some cases, it might take a few nights for the processing to complete. Keep in mind that this feature is still in beta, so processing times might vary.
- Once the processing is finished, you will be notified that your Personal Voice is ready to use.
To check the progress of the creation process, you can go back to Accessibility > Personal Voice. However, note that accessing this setting while the process is ongoing will pause the creation until your phone is locked again.
Related: Best iOS Apps You Should Have For Maximum iPhone Productivity
How to use Personal Voice in iOS 17

Now that we know how to set personal voice on iOS 17, let’s explore how to use the feature. Here’s a step-by-step guide on how to use it:
- Access the Settings application on your iOS 17 device.
- Scroll down and tap on Accessibility.
- In the Accessibility settings, locate and tap on Live Speech.
- Toggle on Live Speech to enable the feature.
- Return to the previous screen and tap on Favorite Phrases.
- Tap the plus icon to add a new phrase.
- Enter the desired phrase of your choice and tap Save.
- Go back to the previous page and find the option labeled under VOICES.
- Tap on Personal Voice and select the voice you generated earlier.
- Now, when you want a phrase to be narrated in your own voice, triple-press the power button to access Live Speech.
Frequently Asked Questions
Personal Voice is an accessibility feature introduced in iOS 17 that enables users to generate a voice that closely resembles their own. This feature provides valuable support to individuals who may face speech difficulties. Through the use of machine learning and a set of predefined prompts, it recreates the user’s voice for more natural and effective communication.
To set up Personal Voice on your iPhone running iOS 17, navigate to Settings. From there, access the Accessibility section and locate the Personal Voice option. Tap on “Create a Personal Voice” and proceed by selecting “Continue.” Follow the step-by-step instructions displayed on the screen to complete the setup process.
During the initial setup, recording the audio clips for training takes about 15 to 30 minutes. However, it’s important to note that the analysis and generation of the personalized voice model from the recorded clips may require several hours.
Yes, you can. If you have other Apple devices connected to iCloud and they support Personal Voice, you can use your iOS 17 Personal Voice profile on them. To enable this functionality, open the Settings app, go to Accessibility, and select Personal Voice. From there, simply toggle on the Share Across Devices option.
No, Apple does not have access to your Personal Voice data in any manner. Your data remains secure and private on your device.
Conclusion
Accessing and using Personal Voice in iOS 17 is a straightforward process. By following the steps outlined in this guide, users can create their own lifelike digital voice and use it to communicate. This feature showcases the thoughtful integration of technology into our lives. Users are therefore encouraged to explore this feature to unlock new possibilities in personal expression and communication.