
Upgrading your laptop from the comfort of your home can be a cost-effective solution for enhancing its capabilities. While laptop upgrades may not offer as much flexibility as upgrades for traditional desktops, there are still several ways to enhance the performance of your laptop.
In this article, we’ll explore these upgrade options, guiding you on how to make the most out of your laptop and maximize its potential for improved performance and longevity.
Signs that it’s Time to Upgrade Your Laptop
If your laptop takes forever to boot up, applications frequently freeze, or there’s noticeable lag during basic tasks, it may be a sign that your hardware and software are struggling to keep up.

In the same breath, running out of storage can hinder your productivity and limit your ability to store important files, documents, or multimedia. If you constantly delete files to make room or rely heavily on external storage, an upgrade is long due. There’s also the aspect of old hardware and software compatibility issues. Newer technologies(software, OS updates, multimedia applications) tend to have higher system requirements over time.
What Components of My Laptop Can I Upgrade?
In most laptops used for business or personal use, you can usually upgrade these parts:
- The main system memory (RAM)
- The primary storage(HDD or SSD)
- The secondary storage
- The battery pack
- The wireless/Bluetooth card
But there are two important parts you usually can’t upgrade:
- The processor (CPU)
- The graphics chip (GPU)
So, while you can make your laptop faster and add more storage, changing your computer’s “brain” and “visuals” is not something you can easily do.
Things to Consider Before Getting Upgrading Your Laptop
Before you begin upgrading your laptop, keep the following in mind:
- Find your laptop’s model information and manual. This will help you choose the right part and guide you through the replacement process.
- Follow safety tips and setup instructions before working on your laptop.
- Not all parts of a laptop can be upgraded. It depends on compatibility and modularity. If a part is soldered onto the laptop’s motherboard, it usually can’t be replaced by the user.
Upgrading the Laptop Memory(RAM)
Adding more random-access memory (RAM) to your computer is a mainstream upgrade that boosts performance and makes multitasking smoother. However, checking if your laptop allows RAM upgrades is important. Some laptops have memories soldered in place, meaning you can’t add more RAM.
To find out if your laptop has soldered memory, check the specifications. If the memory type starts with “LP,” like LPDDR3 or LPDDR4X, it means the memory is soldered, and you won’t be able to upgrade it. On the other hand, if your laptop has SO-DIMM slots, you can upgrade the memory. SO-DIMMs are smaller RAM modules explicitly made for laptops.
To know how much and what type of memory you can add, check your laptop’s specifications or service manual.
It will mention;
- The number of memory slots (usually one or two)
- The memory type and speed (like DDR4-2666 or DDR4-3200)
- The pin count (260-pin for DDR4)
- And the maximum supported amount in gigabytes (GB).
You can use tools like HWiNFO64 or Crucial’s System Scanner website to ensure you buy the right RAM modules. These tools provide information about your current memory and the exact specifications you need. For example, if your laptop uses DDR4, you should get DDR4 RAM modules.
How to upgrade your laptop memory (RAM)
The process for upgrading memory can differ depending on the laptop model. If you have the service manual, it is best to follow the instructions provided. Otherwise, here is a general step-by-step process:
Step#1: Open and locate the RAM slots
Most laptops have a dedicated compartment or panel on the underside that provides access to the RAM slots. If necessary, consult your laptop’s user manual or manufacturer’s website for specific instructions on locating the RAM slots.
Step#2: Remove the existing RAM (if applicable)
If your laptop has occupied RAM slots, gently press the retaining clips or levers on the sides of the modules to release them. Carefully remove the modules from their slots.
Step#3: Install the new RAM modules
Take the new RAM modules and align them with the slots at a slight angle. Insert the modules firmly but gently until they click into place. Ensure that the notches on the modules match the keys in the slots.
Step#4: Secure the modules and close the compartment
Once the new RAM modules are installed, push them down gently to secure them. Close the compartment or panel, ensuring it is appropriately aligned and fastened.
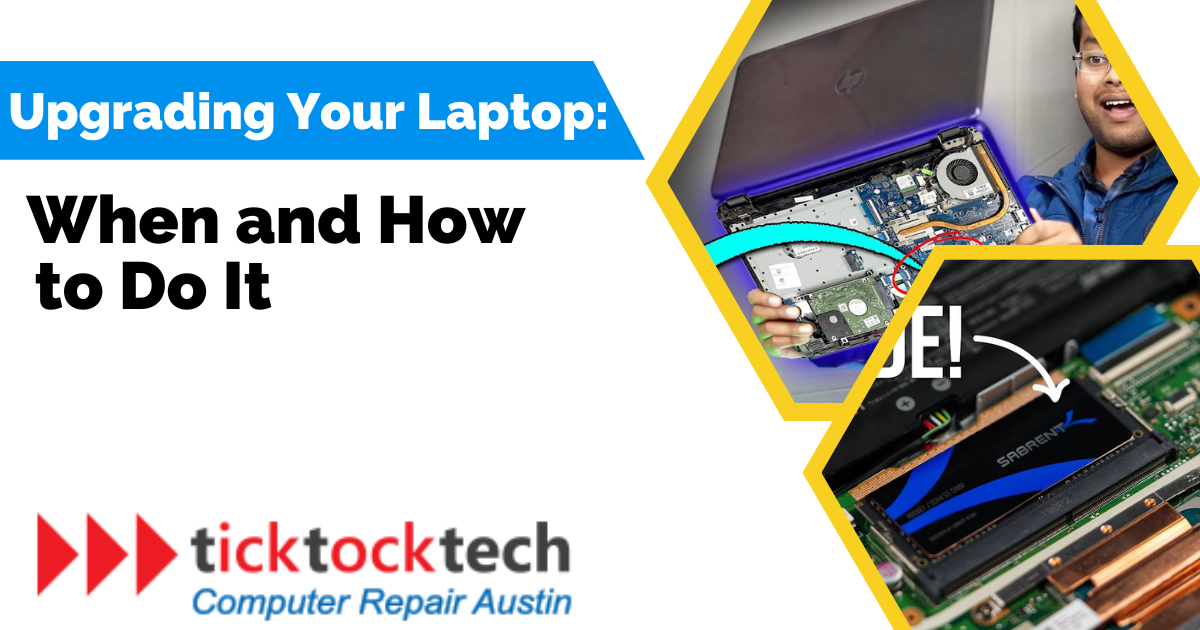
Upgrading the Laptop Storage
Upgrading to a new storage drive can enhance your system’s performance and responsiveness, especially if you switch from an older hard drive to a modern solid-state drive (SSD).
Here’s a tabular summary comparing HDDs and SSDs:
| Feature | HDD (Hard Disk Drive) | SSD (Solid State Drive) |
|---|---|---|
| Technology | Magnetic spinning disks | Flash memory |
| Speed and Performance | Slower access and data transfer | Can reach up to 100x faster access and data transfer than HDD |
| Durability and Reliability | Prone to mechanical failures | No moving parts, more reliable |
| Capacity and Cost | Higher capacities, lower cost | Lower capacities, higher cost |
| Power Efficiency | Consumes more power | Consumes less power |
| Noise and Heat | Audible noise, Generates more heat | Silent operation, minimal heat |
Upgrading your laptop storage from HDD to SSD is a guaranteed all-around performance booster for your laptop. Before upgrading/replacing your hard drive, finding out what hard drives are compatible with your laptop is crucial. This helps you avoid common pitfalls like purchasing a drive that doesn’t fit or installing an SSD on a non-SSD-compatible laptop. To check for compatibility, refer to your laptop’s manual or search for specific models compatible with your PC online.
How to upgrade your laptop storage
Here are step-by-step instructions to help you replace or upgrade the storage drive in your laptop:
Step#1: Backup your data
Before starting the process, it’s essential to back up all your important data from the existing storage drive. You can use an external hard drive, cloud storage, or any other backup method.
Step#2: Power down and disconnect
Shut down your laptop and unplug it from the power source. Also, remove any external peripherals or accessories connected to the laptop.
Step#3: Locate the storage drive compartment
Consult your laptop’s user manual or manufacturer’s website to determine the location of the storage drive compartment. In most cases, it is on the laptop’s underside and covered by a panel.
Step#4: Remove the access panel
Use the appropriate screwdriver to remove the screws securing the access panel. Set the screws aside in a safe place. Carefully remove the panel to expose the storage drive.
Step#5: Disconnect the old storage drive
Identify the existing storage drive and locate the SATA or M.2 connector. Gently disconnect the data and power cables from the drive. Some laptops may require unscrewing additional brackets or screws holding the drive in place.
Step#6: Install the new storage drive
Take the replacement storage drive and connect the data and power cables to the appropriate connectors. Make sure they are securely attached. For instance, if using an M.2 drive, insert it into the compatible slot and secure it with the screw(s) provided.
Step#7: Secure the drive and reassemble
Use screws or brackets to secure the new storage drive in place if applicable. Place the access panel back onto the laptop and screw it in using the previously removed screws.
Step#8: Power on and initialize the new drive
Plug in your laptop and power it on. Enter the BIOS settings (usually by pressing a specific key during startup) and ensure that the new storage drive is detected. Format and initialize the drive using the operating system’s disk management tools if required.
Step#9: Restore your data
Once the new storage drive is initialized correctly, you can restore your backed-up data to the laptop. Transfer your files and reinstall your applications or software.
Replacing the Battery Pack
In the past, most laptops had removable batteries that you could easily swap without using tools. However, nowadays, only a few rugged still have this feature. Nonetheless, it is still possible to replace the battery. We recommend purchasing a genuine battery directly from your laptop’s manufacturer.
Third-party batteries may not meet the same standards or provide the same capacity or performance as the original batteries made by the manufacturer. Getting a genuine battery’s worth spending a little extra money as it ensures better quality and compatibility.
How to replace your laptop battery pack
Here’s a step-by-step Instruction on how to replace your laptop’s battery pack.
Step#1: Locate the battery compartment
Most laptops have a dedicated battery compartment on the bottom or back panel. Consult your laptop’s user manual or manufacturer’s website to determine the exact location.
Step#2: Remove the battery compartment cover(if applicable)
Using a screwdriver, remove the screws securing the battery compartment cover. Set the screws aside in a safe place. Carefully remove the cover to expose the battery.
Step#3: Identify the battery connection
Take note of how the battery is connected to the laptop. It may be connected via a cable or a connector. Pay attention to how it is secured in place.
Step#4: Disconnect the old battery
If a cable connects the battery, gently unplug the connector from the motherboard. If a connector connects it, release the latch or mechanism to detach it from the laptop.
Step#5: Remove the old battery
Once the connection is released, you can carefully lift the old battery from its compartment. Handle it with care to avoid any damage.
Step#7: Reconnect the battery
Connect the new battery to the laptop using the same method as the old battery. If it is a cable connection, plug it into the appropriate port. If it is a connector, align it correctly and firmly press it into place until it clicks or locks.
Step#8: Replace the battery compartment cover
Place the battery compartment cover back onto the laptop and align it with the screw holes. Use the screwdriver to secure the cover by tightening the screws.
Step#9: Power on and calibrate the new battery
Plug in your laptop and power it on. Allow the new battery to charge fully before using it. To calibrate the new battery, let it charge to 100% and then discharge it completely. Repeat this process a few times to optimize its performance.
Upgrading the WiFi Card
To get started on upgrading your laptop’s WiFi card, you’ll need to determine the replacement card’s compatibility with your laptop. The Half Mini PCIe and the M.2 Type-2230 (Key E) are the most common types of connectivity interface. Refer to the laptop’s manual to determine your laptop’s interface type.
How to upgrade your laptop WiFi Card
To upgrade your WiFi card, follow these step-by-step processes:
Step#1: Locate the WiFi card compartment
The WiFi card is typically located in the bottom panel of the laptop. Consult your laptop’s user manual or manufacturer’s website to determine the exact location.
Step#2: Identify the WiFi card
Pay attention to how the WiFi card is connected to the laptop. It will be plugged into a slot and secured with screws or metal brackets.
Step#3: Disconnect the old WiFi card
Gently unplug the WiFi card from its slot by carefully pulling it straight out. To remove the card, use the appropriate screwdriver or tools to loosen and remove any screws or brackets that secure it in place. Keep the screws or brackets in a safe place.
Step#4: Insert the new WiFi card
Take the new WiFi card and align it correctly with the slot in the laptop. Ensure that the connectors on the card match the slot. Gently push the card into the slot until it is fully seated.
Step#5: Replace the panel
Place the panel back onto the laptop and align it with the screw holes. Use the screwdriver to secure the panel by tightening the screws.
Step#6: Power on and install drivers (if necessary)
Plug in your laptop and power it on. The system should automatically detect the new WiFi card. If the card requires drivers for proper functioning, you should refer to the manufacturer’s instructions to install the required drivers. Following the manufacturer’s guidelines will ensure that you install the necessary drivers correctly.
Conclusion: Upgrading Your Laptop
Upgrading your laptop is a great way to improve its performance. Despite the increasing prevalence of soldered components in modern laptops, there are still viable upgrade options for most models. Adding more memory, a larger and faster storage drive, and a new battery allows you to breathe new life into your laptop and extend its usability for several more years. It’s worth mentioning that upgrading the processor and graphics of a laptop is often not possible or practical. Also, knowing when to seek professional help is crucial. If you lack technical expertise or experience with computer hardware, it’s wise to consult a computer technician to prevent any potential damage to your system.