Video creation is one of the most common uses of smartphones now. People either use it for personal or business purposes, and the good part is, that you can achieve whichever aim you set without additional hardware. The iPhone particularly has generally been a successful tool in shooting videos, due to the excellence of its camera features. People who make videos for Instagram/TikTok do usually edit via the apps.
Also, people usually do this by transferring to their laptop for editing. This is 2023, and you can edit, cut, professionalize, and create effects using your iPhone. This will work for professional editing, transitions, creativity, and more. Although, this might require an additional app, and could be free for the most part. To professionally edit videos right on your iPhone, let’s have a look at different methods you can use, and the extent of Edit you can make.
1. Edit Videos with iMovie on an iPhone
iMovie is an accessible video editing application developed by Apple, available for Mac, iPhone, and iPad users. This user-friendly tool not only provides a wide array of video effects but also offers advanced features like color correction and image stabilization. Designed with simplicity in mind, iMovie empowers users, regardless of their video editing experience, to create stunning videos with ease. Its features include animation, drag & drop functionality, social sharing options, design templates, comprehensive video creation, and advanced video editing tools.
2. Choose a Third-Party Video Editing
For third-party apps to edit videos on iPhone, there are different options for paid and free. The best 3 video editing apps on iPhone are VLLO, Lumafusion, and VN. Lumafusion is a paid editor while VN is a free editor. VLLO on the other hand has both free and paid versions, with varying editing features available.
LumaFusion
Just like DaVinci Resolve and Final Cut, Lumafusion. Along with fundamental editing skills, LumaFusion offers more advanced editing tools for iPhone, including chroma key and green screen VFX effects, a magnetic timeline, and other tools. LumaFusion is highly recommended if you’re looking for a simple video editing program without the more sophisticated and professional features that its rivals provide.
VLLO
If you want to edit videos for free and paid on iPhone, VLLO is the best option. With its intuitive but precise control capabilities for split, text, BGM, and transition, beginners and casual users will enjoy producing videos. Chroma-key, PIP, mosaic, and keyframe animations are available as premium-priced capabilities for editors who are professionals. VLLO will be accessible in 2023 for no cost or as a premium service. The free edition does not watermark your clip and simply offers the most fundamental video editing features. A few more sophisticated features are available in the premium version, such as mosaic, certain stickers, BMG, and sound effects.
VlogNow (VN)
Vlog Now is a simple-to-use, watermark-free iPhone video editing program. Video editing is easy because of the user-friendly interface, which requires no prior experience. It provides all the capabilities needed to produce expert-caliber videos, meeting the requirements of both experienced and novice video editors. Additionally, VN offers certain tools for producing unique videos for TikTok, IG Stories, YouTube, and other particular effects.
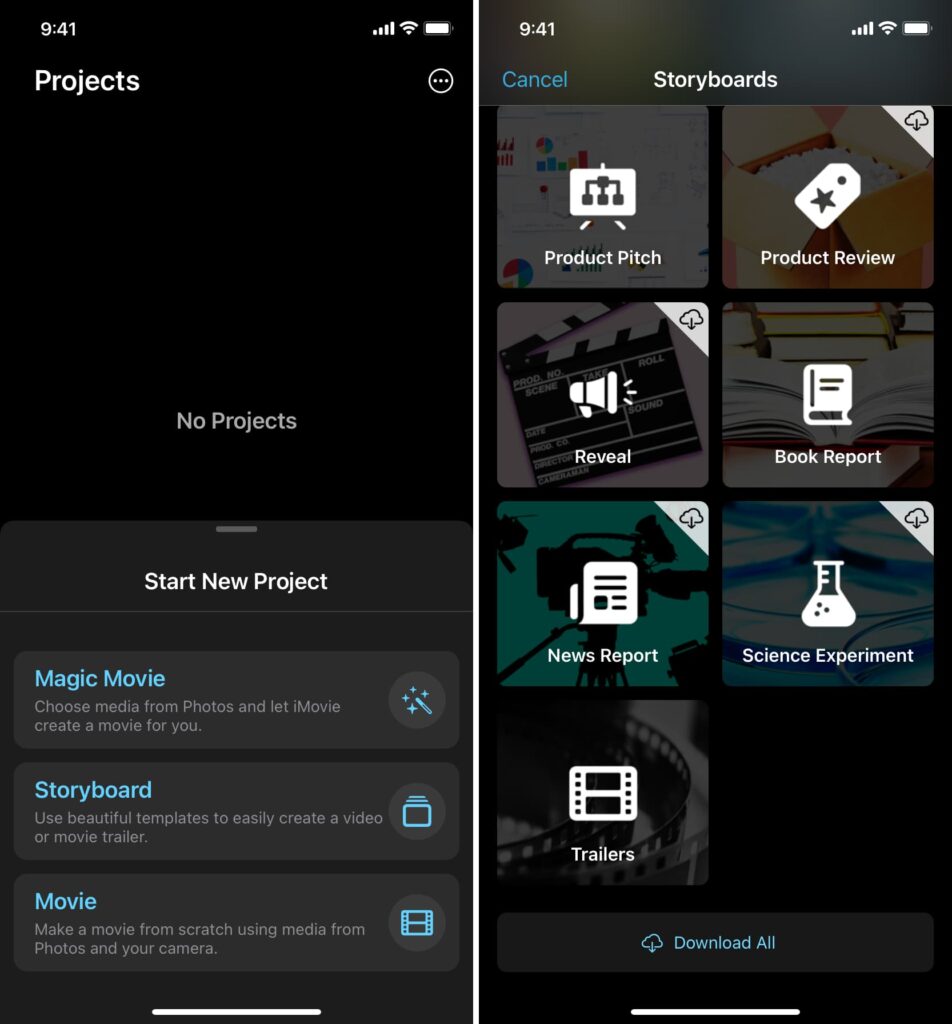
3. Start a New Project
Here, you will insert the video you want to edit. It is usually in the “+” sign on the app, when you click on it, you will be asked to access your media. Grant access and select the video you want to edit. You will be in editing mode after selecting your primary video, you can also edit the video size (Sqaure, 16:9, etc), and add another video if you are looking to combine.
You can also select your video size mode according to where you are posting the video. For instance, there are auto-sized recommendations on the free app VN. You can choose from YouTube, IG, TikTok, IG story and more. On the tab, you can also wap across every second of your video.
4. Cut, Split, and Join Videos
If you have a part of the clip you want to remove, you can move the cursor placed on the clips to a particular start and end point, then remove, adjust, join, and trim your video. These essential steps in the video editing process are normally carried out with the use of professional video editing software.

Cut
Removing a section of a video clip while editing is known as cutting. You do that by choosing the section you wish to delete and doing so. This facilitates the removal of unnecessary material or the production of a shot sequence.
Split
To split a video clip into two or more distinct portions is to divide it. It is possible to use this to isolate a certain section of the video or to introduce more content in between the split pieces. A “split” or “cut” function is frequently available in video editing software for this purpose.
Join
Connecting two or more video clips into a single continuous sequence is known as joining, sometimes known as merging or combining. In most cases, you may accomplish this by choosing the clips you wish to combine and placing them on the timeline of the editing program in the proper order.
Trim
Trimming is the process of shortening a video clip by taking out some of the beginning or end. This is carried out to improve the segment’s timing and length. By moving the start or finish points, video editing software enables you to shorten clips.
Adjust
Modifying various audio and visual aspects of a clip is referred to as video adjustment. Among other things, this entails adjusting the audio volume, color balance, saturation, and brightness. To improve the overall look and quality of the video, modifications are done utilizing the settings or effects of the software.
5. Add Overlay Video
To add an overlay video, you normally layer one movie on top of another in video editing programs like LumaFusion, VN, iMovie, and VLLO. The following are succinct instructions for doing this in each of these apps
iMovie (Mac/iOS):
- In addition to the project’s primary video being edited, add the overlay video
- To add it to the timeline, drag the primary video.
- Drag the overlay video into the timeline after positioning the playhead where you want to add it.
- By selecting it in the timeline and using the cropping and resizing tools, you can resize and adjust the overlay video as necessary.
- To modify the overlay’s transparency, change the opacity.
- Utilizing the overlay, preview and export your project.
VN Video Editor
- In addition to the project’s primary video being edited, add the overlay video.
- To add it to the timeline, drag the primary video.
- Tap the overlay video in the media library, then “Add to the timeline,” then pick “Overlay” from the list of alternatives.
- The overlay video’s position and timing can be altered.
- To regulate how the overlay interacts with the main video, change the blending mode or opacity.
6. Effects and Transitions Addition
Effects are modifications made to the entire video or specific video snippets to affect the atmosphere or aesthetic of the video. These could contain text overlays, animations, filters, color grading, and more. Effects are used to improve or change the visual components of a clip.
On the other side, transitions are strategies for making a smooth connection between two video clips. Cuts fades, slides, and wipes are examples of standard transitions. By linking sequences or shots, they assist in enhancing the overall continuity and storytelling of a video.
iMovies Effects:
- In the timeline, choose the clip to which you wish to apply an effect.
- Depending on the kind of effect you wish to apply, you can find it in iMovie’s “Video Effects” or “Audio Effects” panel.
- Drag the desired effect onto the clip from the available effects (such as color tweaks, speed changes, and audio effects).
- To access the effect options and make any necessary modifications, double-click the clip. To see the effect in action, play the clip.
iMovies Transitions
- In the timeline, choose the clip to which you wish to apply an effect.
- Depending on the kind of effect you wish to apply, you can find it in iMovie’s “Video Effects” or “Audio Effects” panel.
- Drag the desired effect onto the clip from the available effects (such as color tweaks, speed changes, and audio effects).
- To access the effect options and make any necessary modifications, double-click the clip. To see the effect in action, play the clip.
‘Vlog Now’ (VN) Effects
- Select the clip in the timeline to add effects to it.
- In the editing menu, look for the “Effects” option or a comparable tool.
- Choose the effect you wish to use among the ones that are offered (such as filters, text, stickers, etc.).
- You may typically customize an effect’s settings, such as intensity or duration, if they exist. Before saving, play the clip to see the effect in action.
Transitions in VN
- Put two clips next to one another on the timeline to insert transitions between them.
- Tap the intersection of the clips.
- There should be a menu with options for transitions. Choose the appropriate transition (such as dissolve, slide, or fade).
- Some transitions let you change their length or fashion, and more to your liking. Before saving, play the clip to see the effect in action.
7. Add Texts and Titles
Several video editing apps are available on the App Store for iPhone users to add text and titles to their films. The general procedures are as follows:
- There is usually a separate text or title tool in video editing programs. Select a menu item such as “Text,” “Titles,” or “Typography.” You’ll begin writing your text overlay here.
- A text box will show up on your movie timeline or canvas when you tap the text tool. You can now add text to your movie, such as a title, subtitle, or other text that you desire.
- Typically, you can use the options offered by the app to change the text’s features, including font, size, color, alignment, and style (bold, italic, etc.).
- The text box can be moved around the video by dragging it to the desired spot. Typically, by tapping and dragging the text box on the timeline, you may change the text’s place, size, and duration.
- Text animation options are available in several video editing applications. You can use animations like slide-ins and fade-ins, among other effects, to make your text emerge and vanish pleasingly.
- To make sure your video looks exactly how you want it to, preview it with the additional text or titles. Make any necessary modifications. Save or export your altered video when you’re finished.
8. Color Correction and Filters
Certainly! With the help of numerous video editing programs found in the App Store, you may fix the color of films and add filters on an iPhone. An outline of how to generally change the color temperature, brightness, contrast, saturation, and sharpness is given below:
1. Color Temperature
The warmth or coolness of the colors in your film is referred to as color temperature.
Open your video editing program, import the video, and then modify the color temperature.
In the editing tools of the program, look for a “Color” or “Color Correction” option.
The ability to change the color balance in favor of warmer (more orange) or cooler (bluer) tones may be provided through a slider or color wheel.
To get the desired color temperature, slide the control.
2. Brightness
The brightness affects how light or dark your video appears.
Find the “Brightness” or “Exposure” setting under the app’s editing tools.
When the video looks balanced and visually appealing, adjust the slider to raise or reduce brightness.
3. Contrast
The difference between your video’s darkest and lightest areas is influenced by contrast.
In the app, locate the “Contrast” adjustment.
To improve or soften the overall image, use the slider to increase or decrease contrast.
4. Saturation
Saturation regulates the color richness and intensity in your video. Look for the “Color” or “Saturation” option.
To intensify colors, move the control to the right. To desaturate and achieve a more subdued appearance, move it to the left.
5. Sharpness
Your video’s sharpness improves its clarity and level of detail.
Look for the “Detail” or “Sharpness” adjustment.
While adjusting the slider, take in mind that too much sharpness may cause the video to look strange.
9. Add background Music Adjust and Edit the Audio Effects
After the visual editing is done, you can add the music background either from your library or from the iPhone video editing app. Also, you can add Audio effects which include the volume, the sound, the underlay effects, and more.
Adding Music as Background
- On your iPhone, launch your video editing program, then import the video clip you wish to edit.
- Track down the song you want to utilize as the background music. You can usually transfer music from your iPhone’s collection into video editing programs.
- Drag the music track to the editing program’s timeline or audio track. Usually, you can add it to your video’s audio track as a separate track.
- Trim the audio track to fit the duration of your video or change the start and end points as desired.
Editing Audio Effects
To choose an audio clip (your background music), tap on it on the timeline.
Volume Management: The majority of video editing programs have a volume control feature. To balance the background music’s loudness with the audio of the video, or to change its overall volume.
Sound Effects: The equalization, reverb, and fade-in/out features of some apps are all related to audio effects. To improve the sound quality or produce particular audio effects, you can apply these effects to the audio clip.
Fade in/out: Use the fade-in and fade-out features to make your background music transition smoothly. This progressively raises or lowers the audio clip’s volume at its beginning and end.
Audio Keyframes: You might be able to apply keyframes to the audio track using sophisticated video editing software. You may now accurately manage the volume and effects at various moments throughout the movie, and then save.
10. Save and Download on Media
Once you are done and happy with the visual edits and audio effects, save or export your altered video. Usually, the iPhone video editing app will give you the choice to save it to your camera roll or share it on different networks.
What are the Best Free Video Editing App on iPhone in 2023?
The best free Video editing apps on iPhone are iMovies and VN, both free and reliable with basic and advanced effects. iMovie is an accessible video editing application developed by Apple, available for Mac, iPhone, and iPad users VN is a simple-to-use, watermark-free video editing program
How do I Edit my Videos on my iPhone For free in 2023?
To Edit your videos on your iPhone for free, Use either VN or iMovies. Start a new project >> Cut, Split, and Join Videos >> Add Visual Effects and Transitions Addition >> Add Texts and Titles >> Adjust Color Correction and Filters >> Add background Music Adjust and Edit the Audio Effects >> Save or Send.
How can I create YouTube Videos for free with an iPhone in 2023?
You can create YouTube videos using your iPhone Camera, Ring light, and small external microphone. You can also edit your YouTube videos on Vlog Now for free with YouTube edit templates to get the best of YouTube quality Videos.