Screenshots on your Dell Chromebook are a breeze and necessary for a multitude of tasks. Whether you’re showcasing something, keeping a record of modifications, or preserving important information, knowing how to take screenshots is crucial. Here are two major various techniques for taking screenshots on your Dell Chromebook.
Screenshot on a Chromebook with a Keyboard Shortcut
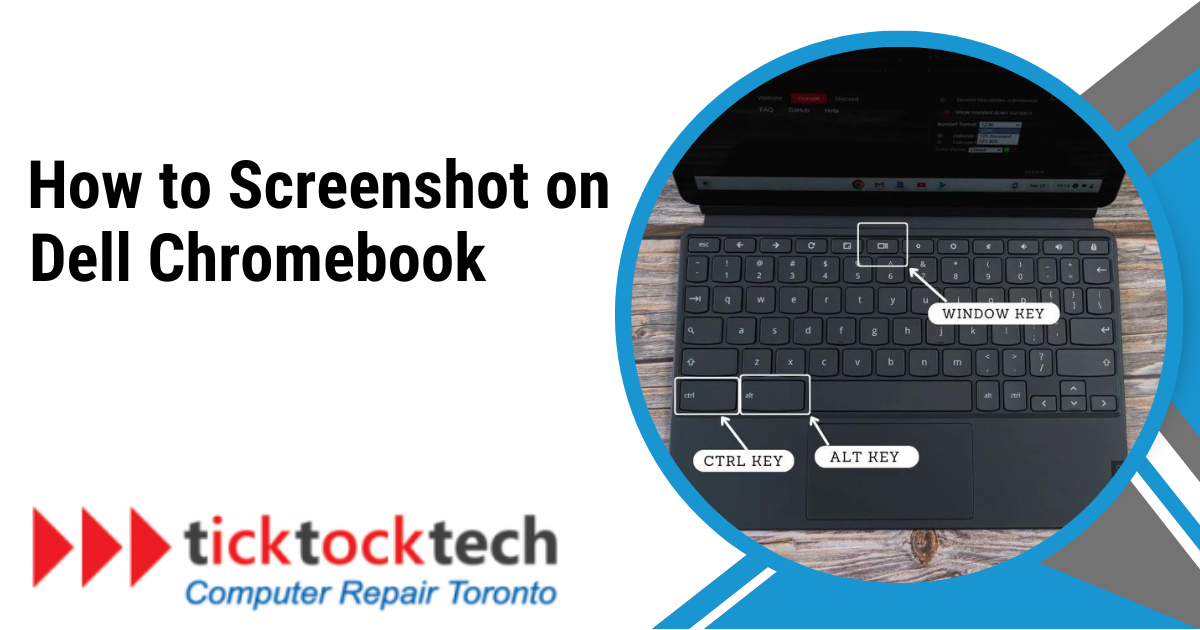
A fast and efficient method for capturing a screenshot on your Dell Chromebook is through the use of keyboard shortcuts. Chromebooks have a convenient feature that allows users to take screenshots effortlessly using just a few keystrokes.
To capture a full-screen screenshot, simply press and hold the Ctrl and Show Windows at the same time. You can easily spot the Show Windows key on your keyboard. It’s a rectangle with two vertical lines next to it, situated in the top row. If you are using an external keyboard that does not have a Show Windows key, you can press Ctrl + F5 as an alternative.
To use only a part of the screen, simply press Ctrl + Shift + Show Windows. You can choose a particular area to capture with this feature. Just drag the crosshair cursor over the desired area and let go of the mouse button to capture a screenshot.
Related: How to Screenshot on ASUS Laptop [Easiest Methods]
Use the Screen Capture Tool in Quick Settings
Google unveiled an enhanced screen-capture tool in Chrome OS 89, making it more user-friendly and accessible through the Quick Settings menu.
To use this tool, follow these steps:
- Open Quick Settings by clicking the time in the bottom right corner of your screen.
- Select Screen Capture.
- In the toolbar that appears at the bottom of the screen, choose whether you want to capture the full screen, a specific window, or a selected area.
- Click Capture to take the screenshot.
In addition, this method provides the capability to capture your screen, which proves to be quite useful when you want to produce a video tutorial or demonstration.
>>> For any Chromebook repair in Toronto, or in Canada, Contact TickTockTech<<<<
Where is My Screenshot saved on Dell Chromebook?
When using a Dell Chromebook, your screenshots will be conveniently saved in the ‘Downloads’ folder as .png files. To locate your screenshots, simply open the Files app from the app launcher and go to the ‘Downloads’ folder. The names of your recent screenshots will follow a format similar to ‘Screenshot 2024-06-16 at 8.30.40 PM’ It will say the date and time of the screenshot, and you can then rename it to identify it specifically.
Chromebooks also come with a convenient feature called Tote, which was introduced with Chrome OS 89. Tote ensures that your crucial files, including recent screenshots, are conveniently accessible. To access Tote, simply open the Shelf, located at the bottom of your screen. Locating your screenshots is made quick and convenient, eliminating the need to search through folders.
See Also: How to Screenshot on HP and Mac laptops in 2023
Can I Edit or Crop my Screenshots on a Dell Chromebook?
Yes, the built-in picture editor on your Dell Chromebook makes it easy to change or crop your screenshots. After taking a picture, do the following:
- Open the Files app and locate your screenshot in the Downloads folder.
- Double-click the screenshot to open it in the image viewer.
- Click the Edit icon (a pencil) in the top-right corner of the window.
- Use the available tools to crop, rotate, and adjust your screenshot as needed.
- Once you’re satisfied with the edits, save the changes.
You can make your pictures clearer and more focused by editing them. This lets you highlight certain areas or get rid of parts that aren’t needed.
Related: How to screen record on a Dell
How do I take the best screenshots on my Chromebook?
Chromebooks have powerful screenshot tools built in, but there are also third-party Chrome apps that add extra features. Tools like “Nimbus Screenshot & Screen Video Recorder” and “Awesome Screenshot” let you edit photos in more ways, add notes, and share them easily.
If you need to annotate pictures or share them with other people a lot, these extensions can be very helpful. To get these tools, go to the Chrome Web Store, look for the app you want, and then add it to your browser. Once they are installed, these tools work with your Chromebook without any problems, making it easier to take screenshots.
>>> For any Chromebook repair in Toronto, or in Canada, Contact TickTockTech<<<<
Conclusion: How Do I Screenshot on a Chromebook Dell?
To sum up, it’s easy and can be done in a few different ways to take a picture on a Dell Chromebook. To take a quick screenshot on Dell Chromebook, press “Ctrl” + “Show Windows” for a full-screen shot and “Ctrl” + “Shift” + “Show Windows” for a partial-screen picture. You can also get to the screen image tool from Quick Settings, which gives you more options, such as the ability to record your screen.
Remember that all of your pictures are saved in the “Downloads” folder. You can change them using the built-in Image Editor or add-ons for Chrome that give you more options.